


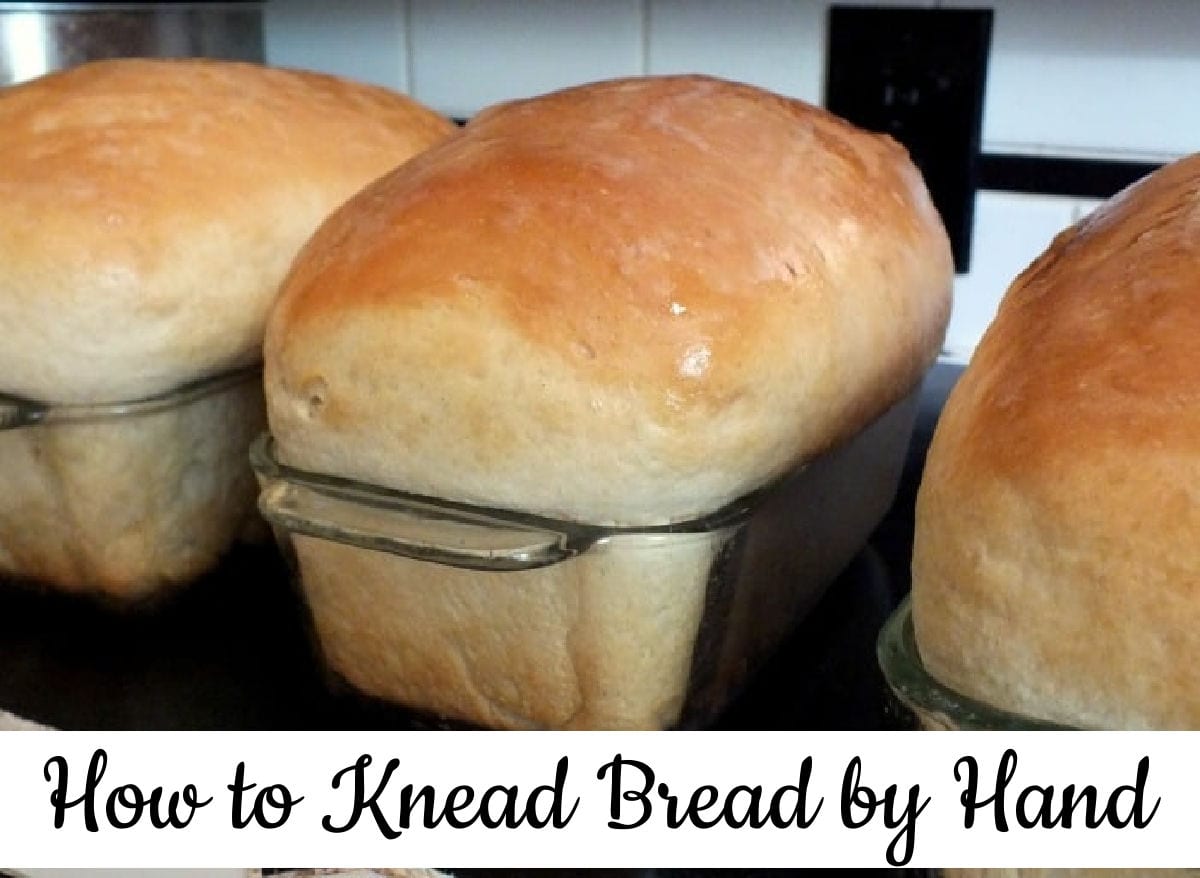
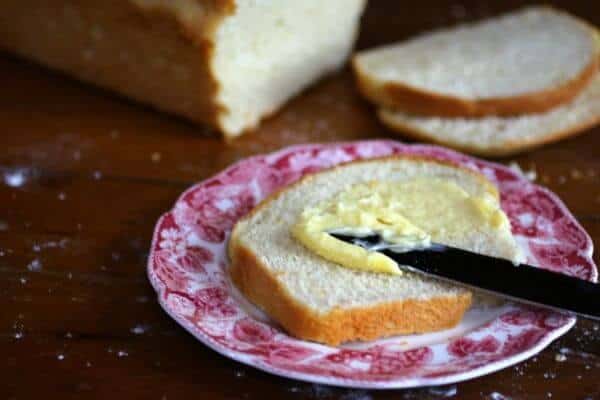
Clear, step by step instructions and images help you learn bread baking from the beginning! You'll see how to tell when the dough has risen enough and there's a video that shows you how to knead it perfectly.
Let's get started!
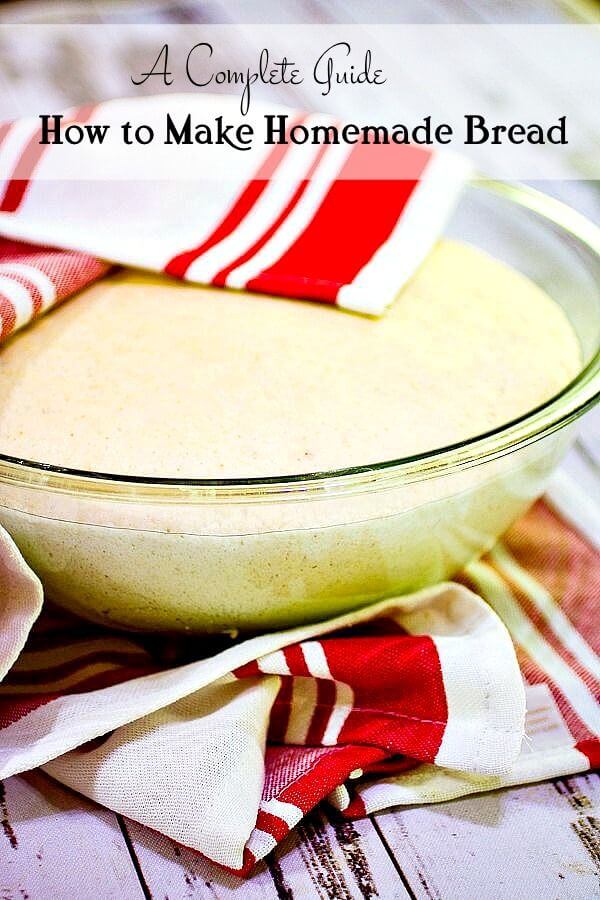
Table of Contents
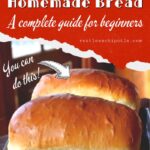
The idea of baking a puffy, golden loaf of bread can be scary but once you've gone through this guide you'll know how to make homemade bread like an expert!
Supplies
There are a variety of tools available to help you on your yeast baking adventure. Some, like a bowl and an oven, are imperative while others are less important.
This list is not all inclusive and there are a few things listed that you may not need or want. I’ve tried to list things in order of importance but what I think is a priority you may feel that you can do without.
You can find many of these things and some of my other favorite bread baking items in the Just Bread Department of Restless Chipotle & Co Store - all my favorites!
- A couple of large bowls – necessary for mixing bread and allowing it to rise. I prefer glass but stainless is fine. I don’t recommend plastic since I am concerned about BPA plus plastic holds flavors and odors and dough picks them up readily. It can add an off flavor to your bread.
- A big spoon – preferably wooden, is necessary for mixing the dough. It needs to be comfortable in your hand and sturdy because various doughs can be stiff and hard to mix.
- Measuring cups – because you need something to measure with, obvi!
- An instant read thermometer – helps you to protect your yeast by ensuring the liquid is the right temperature. You can also stick it down into the bread to see if it's done. When finished it will be 200F in the center.
- A food grade spray bottle – allows you to spray your specialty breads before they go in the oven for a crisp crust.
- Bread pans – many recipes, especially in the United States, are made in a bread pan or some other structured container. Some doughs are stiff enough to make free form on a heavy baking sheet but others are not.
- Hot pads – to help you get the pans out of the oven without burning yourself.
- Kitchen towels (tea towels we call them around here)– to cover the dough while it is rising.
- A serrated bread knife – for even cutting.
- An oven – obviously you need somewhere to bake the bread. You can also use a Dutch oven, a
slow cooker , and even your grill! - Rolling pin – to help with rolling and shaping the dough.
- A kitchen scale – weighing the dough allows you to divide it equally so each loaf or roll is the same size. At some point you may find weighing the ingredients is more accurate, too.
- A stand mixer – if you have a Kitchen Aid or other stand mixer it will work for kneading the dough – just read manufacturer’s instructions. However a (affiliate) Bosch is the best that I have used for kneading dough and it worth saving for. I actually have a Kitchen Aid for cakes and such as well as a Bosch for bread.
- A timer – it’s easy to forget the bread while it is rising, especially if you are doing other things.
- Silicone pastry brushes – for adding oil, butter, or glazes to the crust.
- A bench scraper – helps to scrape dough off the counter, divide dough, and more.
- BPA free bread storage containers - that are airtight. You’ll want more than one.
- Cooling rack – helps the bread cool properly when it comes out of the oven and avoids a soggy crust.
- Quart size canning jars – for sourdough starter, buttermilk, and other ingredients you make yourself.
- Cheesecloth – to cover sourdough starter.
- Specialty pans – for shaping specialty breads. There are a lot to choose from.
- A proofing oven – or a setting on your oven for proofing at 110F.
- Baking stone – is necessary for getting that crisp crust on pizza and artisan breads.
- A bread peel – for getting artisan breads on and off the baking stone.
- Kneading mat – you can use Silpat for this. It’s basically a silicone mat that you knead on so clean up is a snap.
- A journal – allows you to make notes on your bread baking so that you can review what you’ve learned and what you’ve done in the past.
- Grain Mill – I enjoy grinding my own flour from whole grains and it gives a nice, fresh flavor to the bread. It’s a total luxury buy but really nice to have.There are, no doubt, many more gadgets and tools that are nice to have but this is a good list to start with. If nothing else post it on the fridge as a nudge to your family during the holidays!
Ingredients
Homemade bread is actually a very simple recipe with very simple ingredients. Once you have the basics you can add other ingredients and substitute liquids to get unique flavors.
Basic bread has five ingredients and only the first three are really necessary.
- Flour
- Yeast
- Water - Should be 105F to 110F
- Salt - Kosher or sea salt is pure and works well
- Sugar - or other sweetener that contains a form of sugar (honey, maple syrup, etc)
Other liquids can be used in bread making. Most often milk or buttermilk are used but you can also find recipes calling for chicken stock, tomato juice, and even beer! Generally a recipe means whole milk if it doesn’t specify.
Always read through the recipe to check that it has these. If it leaves out sugar, salt, or both you can leave it out, too. Here's the basic formula for homemade bread.
Basic bread formula
Bread = 3 parts flour + 1 part liquid + 1 tablespoon of active, dry yeast for every 6 cups of flour.
In other words - 6 cups of flour + 2 cups of liquid + 1 tablespoon yeast
That makes 2 loaves. But here's the thing... sometimes you'll need to add a little more flour, sometimes you'll need to add a little more liquid.
Bread is not an exact science - it's kitchen magic at its best. Since bread is so simple use the best ingredients you can afford. It makes a difference.
Yeast
If you want to learn how to make homemade bread you'll need to get friendly with yeast. Yeast is what makes bread rise. There are two basic types.
- Commercial that comes in a packet (this is what most people use)
- Starter that you can buy or make yourself
Commercial yeast
You can get yeast in packets or jars at the grocery store or you can get active dry yeast in one or two pound bags online if you are going to make bread a lot. It’s tons cheaper to get the bigger bag and it will last six months or more in the fridge.
- Always let your yeast come to room temperature before you use it.
- When bread rises too fast it doesn’t develop the same flavor and texture. Don't hurry it.
- Always test your yeast by putting it in the bowl and adding about ¼ cup of 110F water to it. I always add a pinch of sugar and ginger, too. Stir it up and set it aside for a few minutes.
- After ten minutes or so you should see that it has bubbled up and is foamy. That means that it is working. You’re good to go. If it doesn’t foam up then you’ll need to get more yeast because yours is dead.
- This is called “proofing” the yeast.
Rapid Rise Yeast
You may see active dry yeast and rapid rise yeast on the same shelf in the store. I'd suggest making bread with active dry yeast until you have a feel for how it all works and then trying it with the rapid rise.
- Rapid rise is also known as instant yeast
- It saves time because it only requires one rise
- You just add it to your dry ingredinets and proceed with the recipe - no need to follow the step for water +sugar+ yeast
- Works best in bread machines
Homemade starter
Homemade starter is pretty easy to make but it takes some patience. My favorite recipe requires a warm window sill and spring water -
Homemade Sourdough Starter (no commercial yeast needed)
Here are some more great sourdough starter recipes:
- Starter made with commercial yeast Tastes of Lizzy T
- Starter made with a purchased established starter Nourished Kitchen
Flour
There are a lot of different kinds of flour - you'll find a more complete guide in this post about 26 Different Types of Flour.
All purpose
All-purpose flour is fine for most breads but you won’t get the same rise and texture as you would have gotten with bread flour. That’s OK if you are inexperienced. All-purpose flour is much easier to knead and work with for a novice bread baker. All-purpose flour has a lower protein content than bread flour making it fine for everything from cakes to sourdough bread. The protein in all-purpose flour ranges between 9% and 12%.
Bread flour
Bread flour is a white flour made from hard wheat and so it is higher in protein than all-purpose flour. It is unbleached and has from 12% to 15% protein. This is the best flour for making bread.
Cake flour
Cake flour is made from soft wheat and has a lower protein content than the other two which keeps cake light and tender. It's not normally used for bread.
Gluten flour - also called vital wheat gluten
Gluten flour has a high protein content. It usually isn’t used by itself but when used with bread flour in bread it gives the dough more spring and helps it to rise higher. Sometimes it's just called "gluten" or "vital wheat gluten".
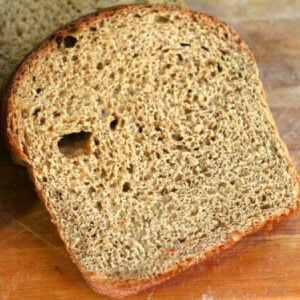
Whole wheat flour
Whole wheat flour contains all of the wheat berry and gives bread a hearty, nutty flavor. It can be hard to work with at first. It takes practice to get it right.
It's easier to use, especially for beginners, if you use half white flour.
Other types
There are other types of flours which include rye, oatmeal, and teff. None of these has enough gluten to allow them to rise unless you’ve used part wheat flour (either whole wheat or white) or add extra gluten flour.
Bread dough
Mixing the dough for bread is just a way of adding the ingredients until it's time to knead. Generally you'll follow the directions in the individual recipe.
For most yeast doughs you'll create a goopy mixture with the yeast, water, flour, sugar, salt, and oil (or melted butter) and then slowly add more flour until it pulls away and "cleans" the sides and bottom of the bowl.
Basic step by step instructions for homemade bread
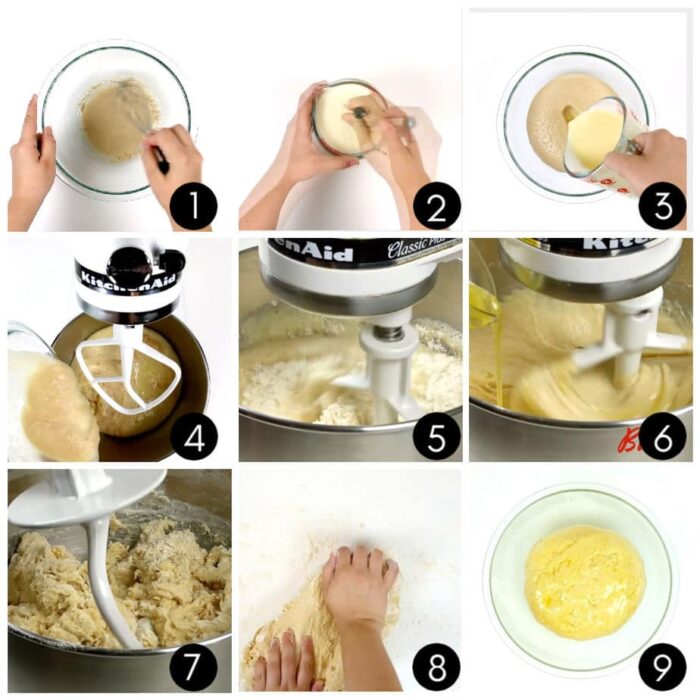
- Mix the yeast, sugar, and water. Set aside until foamy.
- Warm the milk or other liquid.
- Add it to the foamy yeast mixture.
- Add the milk and yeast mixture to a bowl of a mixer fitted with the paddle attachment.
- Add a little of the flour.
- Add flour until the batter begins to get thick.
- Switch to dough hook. Add flour and knead until the dough pulls away from the sides of the bowl.
- Knead by hand for a few minutes until the dough is smooth and elastic.
- Let rise.
For batter breads you'll definitely need to mix it according to whatever the recipe tells you to do - most often 300 strokes by hand (ouch!) or 3 minutes on medium low speed with your mixer.
Not always though. The English muffin bread does best when beaten by hand and just until well mixed.
Kneading
Kneading bread by hand is easy to do but hard to describe. Below is a video I did that shows the procedure. Click the image to be takes to the YouTube Video.
Below the video I've written the step by step instructions.
By hand
If you are 5′ 5″ or under do not try to knead your bread on the counter. You will hurt your arms and back, plus you’ll have to work too hard. Take your bread dough to the table, assuming it is lower.
Your kneading surface should allow your arms to hang with just a slight bend at the elbow when your hands are palm down on it. You may need to knead while standing on a step stool.
- Sprinkle the surface of the table with a little flour to keep the dough from sticking.
- Starting from the middle, push the dough away from you with the heel of your hand.
- Fold the edge back to the middle and give the dough a quarter turn.
- Repeat the pushing and folding action for about 5 minutes.
- Now your arms are probably tired so clean up a little and then come back to the dough.
- Knead it another 5 minutes or so.
- When the dough is ready it will feel somewhat like your earlobe when you pinch it. When you gently pull on it the dough will stretch a little instead of breaking off.
If you are unsure if you have kneaded enough use the window pane test.
- Pull off a small piece of dough.
- Stretch it as much as you can.
- If it is kneaded correctly the dough will stretch very thin without tearing.
By mixer
- Fit the mixer with the dough hooks.
- Mix in your ingredients as directed in your recipe using the lowest speed. It’s best to add the flour ½ cup at a time and mix it in well before adding the next ½ cup.
- When there is enough flour in the dough it will pull away from the sides of the bowl leaving them clean.
- Turn the speed up one notch.
- Knead on this speed for 5 minutes.
- After 5 minutes you can do the earlobe test or the windowpane test but your dough should be right. Do not over knead your dough!
You know, when it comes to bread baking the mixing and kneading are really the hardest parts to get right. If those are done properly everything else more or less falls into place. Ready for the next batch of yeast bread baking tips?
Resting
Resting time is sometimes necessary after kneading or punching down the dough to allow the gluten to relax and lose some of the elasticity that's been created by kneading.
This allows you to roll it out (as in pizza dough) or shape it (as in baguette). Resting time is usually 10 to 15 minutes.
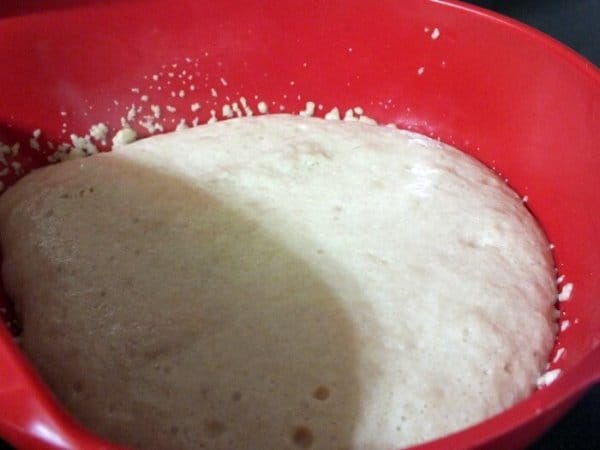
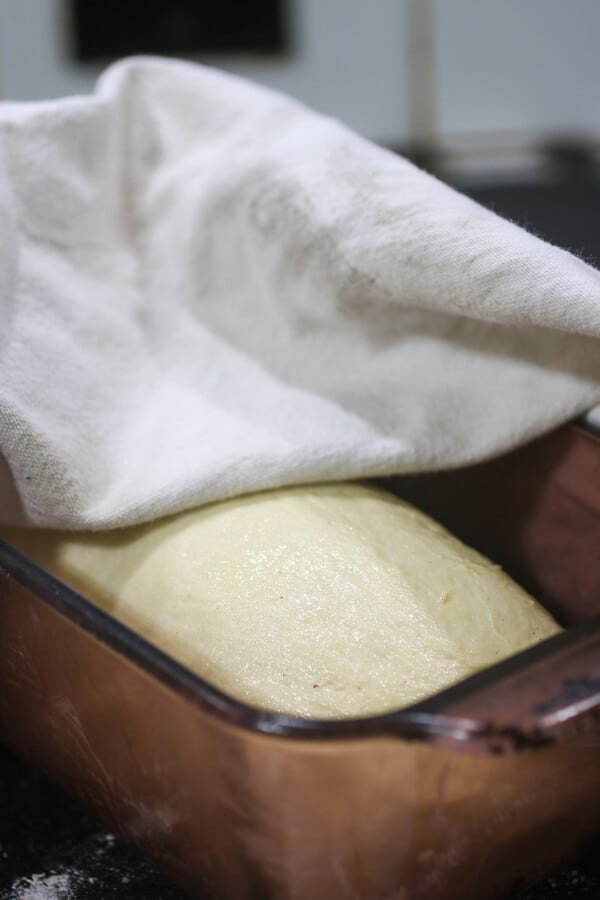
First Rise
A bread recipe may ask you to allow the dough to "rise" or "proof" once, twice, or three times (or more!). Most recipes will call for 2 rising times.
- Form your kneaded dough into a round ball and oil it.
- Place it in a large oiled bowl. This will keep the dough from developing a dry crust on the top— it’s very important. When the yeast produces the gas and the dough begins to puff up a crust will keep it from expanding fully. If it’s kept soft it has the flexibility to puff up like a balloon.
- Now, cover the bowl with a warm, barely damp tea towel. Put the bowl in a warm (75-85F is good but my warming oven is 105F) spot for 1 ½ to 2 hours — or until the dough doubles in size.
If your kitchen is cooler you’ll need to give it a longer time to rise. When the barometric pressure is low, like on a rainy day, your bread will rise higher and lighter than when it is clear and sunny. Scientifically speaking it’s because the air is lighter on stormy days than on clear days so the dough doesn’t have as much weight holding it down.
Where to let the dough rise
Good places are:
- On the counter in the summer
- In the oven with the light on.
- In the oven with a bowl of boiling water next to it.
- On top of the refrigerator.
- On top of the water heater.
- In an insulated container with a hot water bottle (like a Styrofoam cooler).
- On a heating pad turned to low (check heat by laying an instant read thermometer on the pad).
- A microwave oven MAKE SURE IT HAS A 10% POWER SETTING. Place the bowl in the microwave, microwave it on 10% power for 5 minutes, let it rest, and repeat.
What ingredients make bread rise?
Yeast is what makes the bread rise but there are other ingredients that bakers use to help it to rise better. Some of them are:
- dough enhancers
- powdered ginger
- unsalted potato water
- vitamin c powder
- lecithin
- vinegar
- gluten
Dough enhancers
Bread will rise high if there has been sufficient kneading, sufficient warmth, good yeast, and enough gluten. Still, there are some ingredients you can add to make your bread rise higher than average. Check out the post I wrote on 5 Ingredients to Get Your Bread to Rise Higher
Has the dough doubled?
Most homemade bread recipes will tell you to let the dough rise until doubled. This literally means that it is twice as big as when you started due to the action of the yeast and the gas it puts off.
What is meant by 1-½ times rise in bread making?
Basically it just means that the dough has risen about 1-½ times it's original size.
Here are a few ways to tell if it's doubled or not:
- Use a glass bowl and mark the glass evenly with the top of the dough with a marker. You'll be able to look at it and tell when it's double
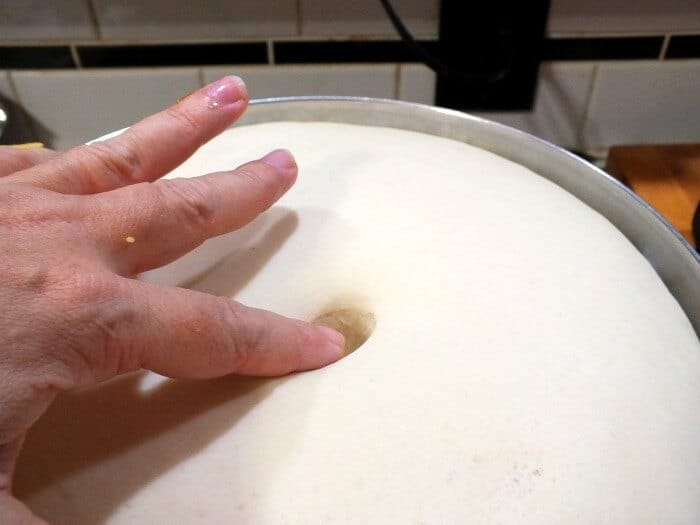
- Poke your finger gently into the dough to your first knuckle. If it feels elastic or pushes back against your finger give it a few more minutes. If the dent stays without filling in you can safely assume that it has doubled.
- Due to the rising process the bowl will feel lighter than before.
- Once it's doubled you'll follow instructions about punching it down and further rising times.
Second rise
Once you’ve gotten the air out you’ll want to let it rise again.
Remember, yeast is a living organism so while it was rising the first time the yeast cells were doubling, too. Now it has twice as much yeast living in it as it did before.
What does that mean to you?
Well, for one, it will rise much faster than the first time. All of those extra yeasties are making their own carbon dioxide gas.
The extra gas bubbles also mean that the bubbles are smaller and the grain of the bread is more finely textured. The second rising usually doesn’t take more than 45 minutes — often only 30. This is a good time to work on cleaning up the kitchen if you haven’t already.
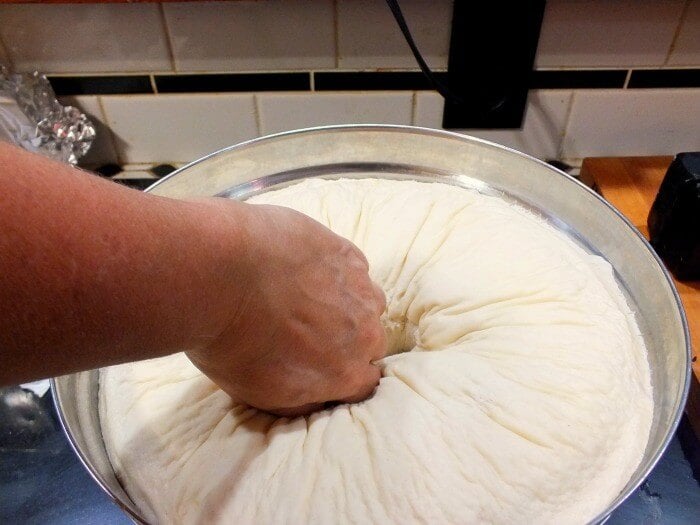
Punching down
After the bread has risen the first time you will punch it down.
Basically you push your fist into the dough and gently knead it a few times to deflate it. This takes the big air pockets out so it’s especially important in sandwich bread.
After the first rise
If you aren’t letting it rise two or three times (and many times you won’t) you’ll skip to the shaping now.
After the second rise
Now, you are just going to punch it down like you did the first time. This time let the dough rest for five to ten minutes, covered with that damp tea towel. This gives the gluten time to relax and makes it easier to shape your dough.
How to shape dough
After the last rising you'll let the dough rest a few minutes then shape it. Then you are going to let it rise one more time.
- Cover the loaf with a warm, damp tea towel and put it in a warm spot.
- Let it rise until it just barely comes above the loaf pan and the pan feels light when you lift it.
- This can take anywhere from 30 minutes to an hour.
- When it's risen punch it down.
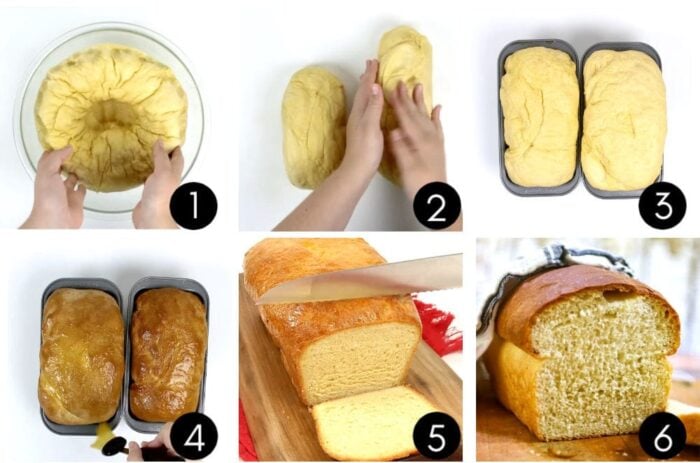
- Separate and shape into loaves.
- Place in greased pans.
- Bake.
- Let cool and slice.
- Cover with a tea towel during cooling to keep the crust soft.
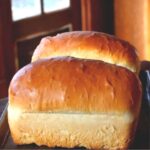
Loaves
Gently work your homemade bread dough into a loaf shape and then tuck the ends underneath. There are several ways to do this but the two most often used are:
- Roll it into a rectangle as wide as your bread pan is long. Roll up tightly like a jelly roll, pinch the seam on the bottom to seal, and tuck the ends under.
- Just squeeze it into shape with your hands, tucking the ends under.
- Place the loaf in a greased 8’X4″ or 9”x5” loaf pan and grease the top.
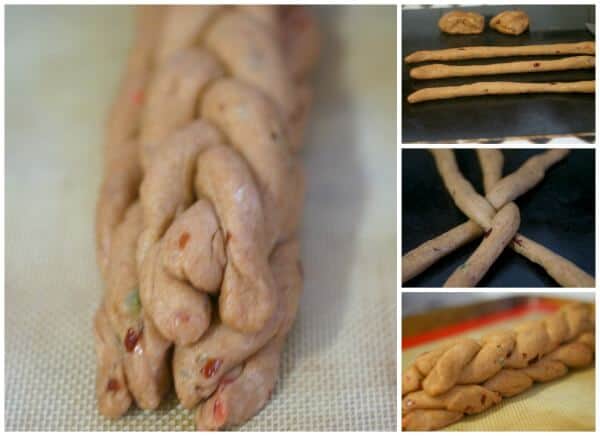
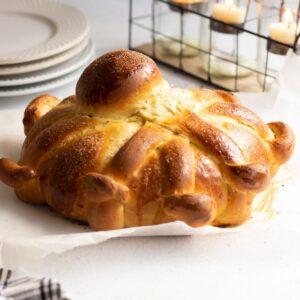
Braids
To form a braid you’ll take your dough and separate it into three equal pieces per loaf. Roll each piece between your hands and the counter until you have a rope about 12 inches long. Repeat with the other pieces. Start at the top and braid just like you would hair, tucking the ends under. Put it in your bread pan.
For a more even braid, and after you have some experience start braiding in the center and braid out to each end.
Here’s a quick look at how it’s done:
- Divide the dough into 3 parts and roll each into a rope.
- Bring one rope over the center rope just like braiding hair.
- Repeat with the other rope.
- Braid all the way down and tuck the ends under.
You can also double braid by stacking a second braid on top of the first one before the last rising time.
This Viennese Christmas Loaf uses a double braiding technique.
Specialty Shapes
I think one of the most satisfying things when you know how to make homemade bread is that variety of shapes you can create with the dough! Rounds, ovals, coils, braids - and in some countries they even make figures to resemble people or animals!
Rounds
Rounds are easy! Just roll the dough into a ball and flatten it slightly. Some bakers cut a cross in the top to help it rise more evenly.
Ovals
To make an oval just roll the ends of the rounds a little until the ball elongates. Oval loaves often have diagonal slashes or diamonds cut into the tops.
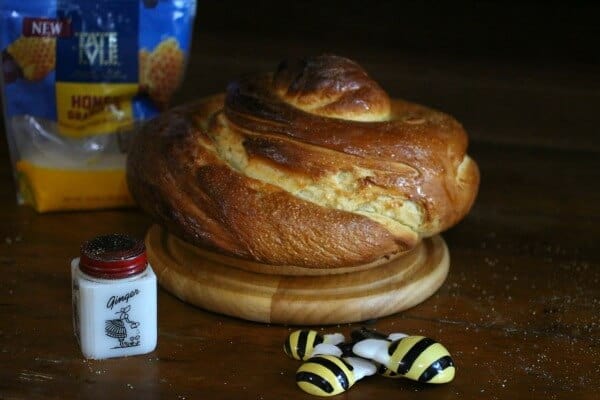
Coils
Roll the dough into a long rope and coil it around and around until it's a round loaf as in the honey bun loaf below.
Baguettes
Form baguettes by rolling between the palms of your hands and the countertop, creating a long, tapered loaf.
The perfect crust
Bread crust preference is one of those things that varies with the individual.
No matter what kind of crust you like there are techniques for achieving it when you make your own homemade bread! Prepare a “wash” to be brushed on the loaf just before baking. Each wash achieves a different type of crust.
- Melted butter brushed on the loaf before and after baking makes a soft, buttery crust that is rich and delicious.
- A whole egg can be beaten with a tablespoon of water and then brushed on the top. This results in a shiny, golden brown crust.
- An egg white can be beaten with 1 ½ teaspoons of water to create a shiny, slightly crispy, light crust.
- An egg yolk can be beaten with two teaspoons of water to make a shiny, golden crust.
- A milk wash will make the crust dark brown, soft, and more of a matte.
- Water brushed on the crust before baking makes the crust crispier.
- You can also achieve a very soft crust by covering the bread with a dry tea towel as it cools.
- You can achieve a very crisp crust by leaving the bread in the oven with the oven turned off for ten minutes after the suggested baking time.
Baking
In the oven
Bake the bread for the suggested time. You can place an aluminum foil tent over it if it seems to be browning too much. The bread is done when you can tap the top or bottom and it sounds hollow.
In the slow cooker
- Shape into a round loaf on a piece of parchment or add to a bread pan.
- Lift the parchment into the
slow cooker or add the bread pan to theslow cooker . Cover with the lid. - Set
slow cooker to high and bake for 1 to 2 ½ hours. Begin checking the loaf after 1 hour, then every 20 minutes or so after. - Use an insta-read thermometer to check the internal temperature of the bread. Push into the side of the loaf. When finished the loaf will have an internal temperature of 200F.
On the grill
- Use a pizza stone and preheat the stone and the grill to 375F to 400F.
- Gently place the risen loaf (don't use a bread pan for this - use a free form loaf) on the pizza stone as directed in your recipe or in the pizza stone instructions.
- Bake for 20 minutes or until the internal temperature is 200F.
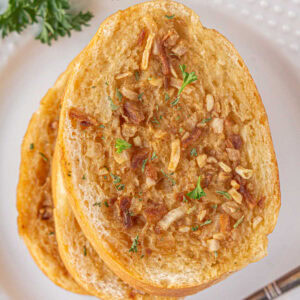
Specialty breads
Once you know the basics of how to make homemade bread you can branch out to specialty breads and specialty techniques.
Adding ingredients
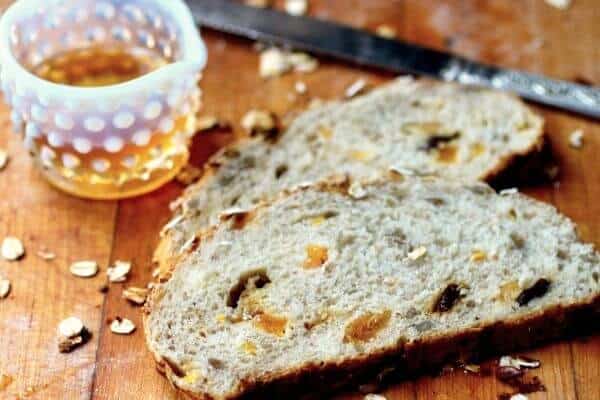
You can add dried fruit and/or nuts to most bread doughs by just kneading them in. Remember that dried fruit will add moisture so you'll want to cut back on liquids just a little.
- Sprinkle part of the ingredients on the dough and knead.
- Add more ingredients and knead.
- Continue until all the ingredients are incorporated into the dough.
Flaky (laminated) dough
Laminated dough like croissants or danish takes several hours to make because it must be turned, rolled, and chilled several times before shaping and baking.
Doughnuts
Dough for yeast raised donuts should always be kept as sticky as possibly to ensure the donuts are tender.
- Cut well floured dough straight down with the donut cutter.
- Let rest for the period of time specified.
- Fry 3 or so at a time, in 365F oil, being careful the oil doesn't cool too much when you are adding the donuts.
Storage
- Store in a plastic bag or covered container for up to 2 days.
- For longer storage wrap tightly and freeze. I like to slice bread and put parchment or waxed paper between the slices before freezing so I can just take as many as I need without thawing the whole loaf. Bread is fine in the freezer for up to 3 months.
Troubleshooting
There are lots of things that can go wrong and if you are a beginning bread maker it can be hard to figure out just what the problem was. This Bread Troubleshooting Guide will help.
Expert tips
There's no substitute for experience but it's good to be able to learn from other people's mistakes. Here are my best tips for baking yeast breads.
If you've still got questions you'll likely find the answers in Bread Baking FAQs.
Now that you have all of the information it's time to try baking some homemade bread!
📖 Recipe

Basic Homemade Bread
Print Pin Recipe Save Recipe Rate RecipeIngredients
Instructions
- In a large bowl, dissolve yeast and 1 teaspoon of the sugar in the warm water.
- Let stand until the surface gets foamy and bubbly - about 10 minutes.
- Whisk together remaining sugar, salt, and 3 cups of the flour.
- Stir cooled butter into yeast mixture then pour into flour mixture.
- Beat until smooth.
- Stir in enough remaining flour, a little at a time, to form a soft dough.
- Turn onto a floured surface; knead until smooth and elastic, 8-10 minutes. (see video)
- Place in a greased bowl, turning once to grease the top.
- Cover and let rise in a warm place until doubled, 1-½ to 2 hours. (see image)
- Punch dough down.
- Turn onto a lightly floured surface; divide dough in half.
- Shape each into a loaf. (see section on shaping)
- Place in 2 greased 9x5-in. loaf pans.
- Cover and let rise until doubled, 1 to 1-½ hours.
- Bake at 375° for 30 minutes or until golden brown. Bread will sound hollow when tapped.
- Remove from oven, place pans on their sides, and cover with a tea towel for soft crusts.
- After 5 minutes remove from the pans and allow to cool before slicing.=
Notes
- Use a glass bowl and mark the glass evenly with the top of the dough with a marker. You'll be able to look at it and tell when it's double
- Poke your finger gently into the dough to your first knuckle. If it feels elastic or pushes back against your finger give it a few more minutes. If the dent stays without filling in you can safely assume that it has doubled.
- Due to the rising process the bowl will feel lighter than before.
- Once it's doubled you'll follow instructions about punching it down and further rising times.
- Store in a plastic bag or covered container for up to 2 days.
- For longer storage wrap tightly and freeze. I like to slice bread and put parchment or waxed paper between the slices before freezing so I can just take as many as I need without thawing the whole loaf. Bread is fine in the freezer for up to 3 months.
Nutrition Facts
Nutrition information is estimated as a courtesy. If using for medical purposes, please verify information using your own nutritional calculator. Percent Daily Values are based on a 2000 calorie diet.
This recipe has been tested several times. If you choose to use other ingredients, or change the technique in some way, the results may not be the same.
First published October 2018. Last updated April 10, 2020 with more information, better images, and better reader experience.

Kim says
Thank you for the best bread recipe! I love baking bread, while it loves hips !!!
Janice Jenkins says
Wow! So much great information! And I haven't even read e everything or followed all the links! I can't wait to put some of this in practice! Thanks so much!!
Livi says
This is one of the most wonderful trainings i had undergone.
Mrs Marym, you are truely a wonderful teacher and writer, love you n learnt alot from this.....kisses.
Marye says
Thank you!