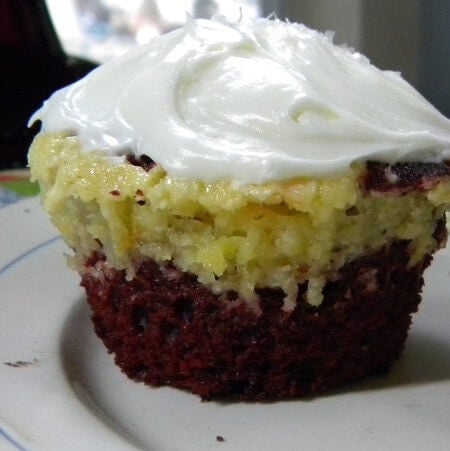
We did the taste test of all taste tests yesterday. I made Red Velvet cupcakes twice, once with beets for the red color and once with the red dye. I used the same recipe both times, with the exception of the beets vs. the dye.
I was "rooting" for the beets. Get it? Rooting?
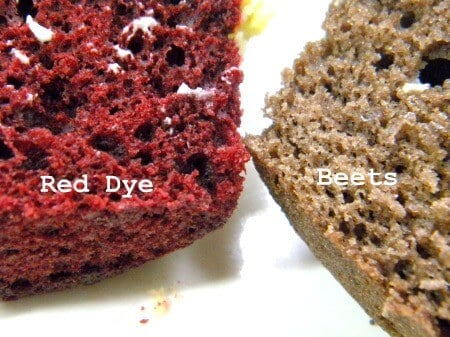
The beet option was not better. It was awful. I had made red velvet cake with both items before but never at the same time, with the same recipe. The beets made the chocolate more brown but it was drier. The red food dye did what it was supposed to do. For both of the recipes I adapted the Red Velvet Cake recipe in the Hummingbird Bakery Cookbook. So, much as I want to say that natural is better... I can't. If you want red velvet cake, and you want it to be red and good..you are going to need to do the old fashioned thing and go with dye.
Now, the rest of it...imagine biting into rich red velvet cupcake and finding orange cheesecake. The combination of chocolate and orange is fantastic anyway, and the tangy citrus and cream cheese cuts the sweetness of the cream cheese frosting and red velvet cake perfectly. I loved these. My family loved these. You are going to love these!
Be careful not to overbake. You want the cheesecake to remain creamy...and it will cook for a little bit as it cools.
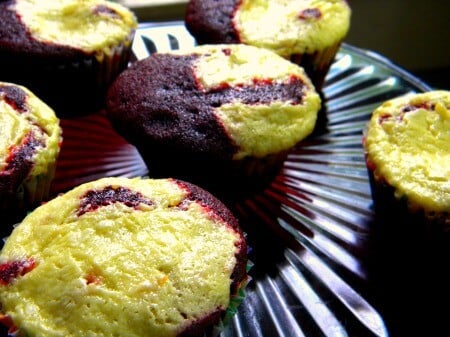
I usually use silicone baking cups, but since I was doing a double batch I didn't have enough. I used paper ones...but I turned the water off when I brushed my teeth and I didn't rinse...so it evens out.
The list of directions looks long, but it is really quick and easy. These are so awesome and they take no more time than a regular cupcake. Yum!
📖 Recipe
Red Velvet/Cheesecake Marbled Cupcakes
Print Save RecipeIngredients
Orange Cheesecake
- 1 4- oz package of cream cheese, , room temperature (not low fat)
- 2 tablespoons of freshly grated orange peel
- ½ cup sugar
- 1 egg
- ½ teaspoon vanilla
Red Velvet Cake
- ¼ cup unsalted butter
- 1 cup sugar
- 1 egg
- 3 tablespoons dark cocoa powder
- 4 oz food grade red food color
- 1 teaspoon vanilla
- ½ cup buttermilk
- 1 cup plus 2 tablespoons all purpose flour
- ½ teaspoon of baking soda
- 1 ½ teaspoons white vinegar, (it has less flavor than any other type)
Cream Cheese Frosting
- 4 cups confectioner's sugar
- ⅓ cup unsalted butter
- 8 oz cream cheese
Instructions
Before Mixing
- Preheat oven to 325F.
- Add cupcake liners to pans
Orange Cheesecake
- Beat together until creamy and well blended.
- Do not whip because you don't want to incorporate air.
Red Velvet Cake
- Cream the butter and sugar until fluffy.
- Add the egg and vanilla and beat well.
- Use a rubber scraper to pull any remaining butter mixture off the sides and bottom of the mixing bowl.
- Mix again until well blended.
- In a separate bowl mix the food color and the cocoa until it makes a paste.
- Add the cocoa mixture to the butter mixture and mix until it is evenly blended.
- Spoon through to check for streaks.
- Add ¼ cup of the buttermilk and beat on low speed until blended.
- Add half of the flour and blend.
- Add the remaining buttermilk, blend and then add the remaining flour.
- Now stir in the baking soda and vinegar
Assemble
- Fill muffin cups about ¾ the way with the red velvet batter.
- Add a tablespoon or so of cheesecake batter to the top.
- Bake for 20-25 minutes, or until cupcakes are firm to the touch. Don't overbake.
- Cool completely.
- Cover with frosting
Cream Cheese Frosting
- Mix butter, salt, and confectioners sugar until crumbly.
- Add the cream cheese and beat until creamy, add a little cream if you need to to get the right consistency.
- Swirl a good layer atop the cooled cupcakes.
- Sprinkle with cocoa, edible glitter, or orange zest.
- Keep any remaining cupcakes (as if!) in the refrigerator.
Nutrition information is estimated as a courtesy. If using for medical purposes, please verify information using your own nutritional calculator. Percent Daily Values are based on a 2000 calorie diet.
images:marye audet


anupa
hi, can i bake without a muffin pan and directly on a pan with the silicone liners?
Marye Audet
I don't see why you couldn't. I haven't tried that but I am sure it would work.
Bea.
Thank you Marye, for getting back to me so quickly.
I am trying them out tonight, keeping my fingers crossed. XX I am hosting a Cancer Charity, coffee and cake morning tomorrow, so am hoping they will work out. Wish me luck!
Thanks again for you advice.
B x
Bea.
This might be a stupid question, but how long do you leave the cream cheese out for to get to "room temp"?, and what should I look out for to know, that it is the right temp to use?
Thank you and apologies again, if this is a silly question.
Marye Audet
No such thing as a silly question. There is no set amount of time to leave it out. Sometimes in the winter when the house is cold it may never get warm enough and in the summer it usually only takes 15 minutes or so. A few seconds in the microwave will sometimes do it. Saying that, you want it to be warm enough that it blends easily and is creamy - maybe even a little "melty"
Yoli Rodriguez
Marye,
Thank you for sharing this recipe. I finally baked these last night and although I need to sharpen my frosting abilities, I must say that these are the most delicious cupcakes. All my ingredients were at room temperature, as indicated and my cupcakes are decilious. Thank you again.
lovepink559
What temperature do I bake them at? 🙂
Marye Audet
325F. 🙂 It's at the top of the recipe.
Ashley
A-M-A-Z-I-N-G!! I'm bringing these to a cupcake party and I'm pretty sure they might win! Although my decorating skills didnt come through as I hoped, they are delicious and I topped them with some candied orange peels. We have to come up with a creative name and I've decided to name these bad boys "Supreme Dream". Thanks so much for the recipe!!
Bernadette Pierson
These cupcakes were the best i have ever eaten!Super easy and super good.love it!
Consuelo
U an searching in the internet for the most appealing cupcakes upon my teenager daughter's request. Saw this recipe and said, this is it. And yes, this cupcake is simply delicious though I am not quite sure of the food grade red food color, is it the regular liquid food color of old times, or the gel type???4 tablespoon of the gel would be much, I used a whole small container maybe 2 tsp. the most and flavor was too strong... I do not leave in the USA and the gel type is imported and of course expensive and is sold just in a specialized store... Thanks for your reply
marye
It is the liquid. 4 oz bottle.
Janine Stonehouse
We had a Cupcake Challenge at work today with the proceeds going to the United Way. I made your Red Velvet & Cheesecake Marbled Cupcakes and I won first prize! It was a unanimous decision of the 4 judges. People loved them and said they were very moist.
Hessa dakheel
Wonderful recipe with wonderful taste thank a lot 🙂
Lexi
Hey marye thanks for the recipe. Today is my 11th birthday!!!! Im bringing some of these to my class. it is now my favorite cupcake.
Marie
I just made these and sadly it was a complete disaster. I followed the recipe exactly and everything looked fine until i put them in the oven. First they bubbeld over, dripped everywhere and would not set, even after i baked them for 40 minutes and when i took them out of the oven they compeletely deflated. Too bad, I was really looking forward to this :s
marye
I am sorry Marie. I have tried to figure out why some commentors have trouble while others have no trouble at all. You might want to review the comments to see if your problem was addressed in them.
Marie
So, I decided to make them again today, because when it comes to baking I simply refuse to give on a recipe, especially one as yummy as this. I reduced the amount of butter and flour a little bit, increased the cheesecake batter (about 1/3 more), divided the batter into 16 cupcakes and voila - perfection! I think the main reason that it didn't work the first time was, that I overfilled the cupcake molds, too much batter for 12 but just right for 16 cupcakes. Will definitely be making them again.