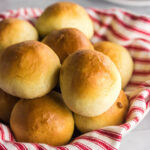
Quick Dinner Rolls
Hot, buttery yeast dinner rolls in 30 minutes! You can do it with this recipe. Easy enough for a beginner.
Servings 12
Calories 183kcal
Equipment
Ingredients
- 2 tablespoons instant yeast
- ¼ cup sugar
- ¼ cup butter divided use
- 1 cup buttermilk
- 1 egg room temperature
- ½ teaspoon salt
- 3 cups bread flour you may need a bit more
Instructions
- Place parchment on a 13x9-inch rimmed baking sheet.
- Melt butter and set aside to let cool.
- Heat buttermilk to 110F.
- Add sugar and yeast to to the bowl of your mixer.
- Add 2 tablespoons of the butter, buttermilk, and egg to the yeast mixture.
- Add the paddle and mix on low speed until combined.
- Slowly add 1 cup of the flour.
- With mixer on medium speed add the salt and remaining flour a little at a time, until the dough pulls away from the sides of the bowl.
- Dough will be sticky but won't cling to your fingers.
- Shape into 12 round rolls and place on the parchment.
- Set the oven on preheat and preheat to 400F.
- Cover with a tea towel and let rest for 10 minutes while the oven preheats.
- Bake for 8 to 10 minutes or until rolls are golden brown and interior temperature is 190F when you check with an instant read thermometer.
- Remove from the oven and brush with reserved butter.
Notes
Storage:
Place in an airtight container and keep at room temperature for 2 days. Freeze for longer storage.
Tips:
- The ideal water temperature for blooming yeast is around 100 degrees F. It should feel very warm, but not so hot that you wouldn't wash your face with it. Too cold or hot and the yeast won't do it's job!
- Active dry yeast requires blooming, or activating. If you're using rapid rise or instant yeast, you can skip the blooming step.
- Salt can harm the yeast. While some recipes urge you to mix salt into the water/sugar/yeast mixture, it's best to do so at the end with the flour.
- When using just a handful of simple ingredients, they all need to be fresh and in good condition. For best results, be sure your yeast and flour are not close to expiration.
- Read the recipe before getting started so you know exactly what items need to be at room temperature or warmer. The temp is important!
- More kneading rather than less is preferred for homemade bread and rolls. Unlike cakes, which you want tender and crumby, the best dinner rolls are worked thoroughly to create a nice, bready structure inside.
- Often, hand mixers will come with dough hooks. However, the motors usually aren't strong enough to handle a dense bread dough, so I don't recommend using one for these quick dinner rolls.
- On the other hand, don't knead too much, or your bread can be tough. If you pull a piece off of the dough with two fingers, it should hold it's shape, rather than flopping immediately on either side of your fingers.
- Don't use too much flour! It's okay if your dough is a little sticky. You want to be able to handle it, but too much flour can turn fluffy rolls into dry lumps.
- Some people like to use a kitchen scale to make sure each round ball of dough is exactly the same size. It's not necessary by any means, but if you're a perfectionist, you can try this method!
- Try to portion the dough out evenly without smashing it down too much. I like to cut the dough in half a few times, cutting each section into smaller, even pieces, until I have 24 rolls.
- Let the dough rise in a warm place. If your oven is preheating, you can set the dough next to the oven, as long as it's not too hot.
- 75-80 degrees F is perfect for porch sittin' and letting dough rise, so if it's a warm afternoon where you live, set the dough out on your patio!
- You can increase the rise time up to a half hour if you aren't in as much of a hurry. It won't hold you to the 30-minute dinner roll time line, but I don't think anyone will hold it against you!
Nutrition
Calories: 183kcal | Carbohydrates: 28g | Protein: 5g | Fat: 5g | Saturated Fat: 3g | Polyunsaturated Fat: 0.5g | Monounsaturated Fat: 1g | Trans Fat: 0.2g | Cholesterol: 26mg | Sodium: 155mg | Potassium: 71mg | Fiber: 1g | Sugar: 5g | Vitamin A: 172IU | Vitamin C: 0.002mg | Calcium: 31mg | Iron: 0.4mg