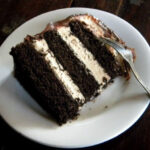
Burnt Sugar Fudge Layer Cake with Peanut Butter Mousse
A moist, fudgy chocolate cake with an airy peanut butter mousse filling. A must for chocolate-peanut butter fans.
Servings 16 servings
Calories 745kcal
Equipment
Ingredients
Cake
Sugar Syrup
- ¾ cup water
- 2 cups granulated sugar
- ¼ cup caramel vodka
Peanut Butter Mousse
- 1 cup creamy peanut butter
- 2 ½ cups heavy cream
- 1 -¼ cups confectioners sugar
- ¾ cup cream cheese
- 2 tablespoons heavy cream
For the Ganache
- 1 cup of chocolate chips
- 1 cup heavy cream
- 2 tablespoons unsalted butter
- 1 tablespoon corn syrup this is optional but it keeps the ganache shiny
Instructions
Cake
- Preheat oven to 350
- Grease and flour 3 8-inch round cake pans
- Add the white sugar to a heavy pan on medium heat
- Let it melt, stirring, until it becomes a liquid and becomes golden brown
- When it reaches a golden brown color carefully add ½ cup boiling water to the sugar and stir to combine.
- Add the butter, cut in small pieces, and stir until melted.
- Set aside to cool slightly
- Mix the flour, cocoa, brown sugar, baking powder, baking soda, and salt in the bowl of a mixer.
- Add eggs to milk and whisk until combined.
- Add the egg mixture to the flour mixture on low speed just until mixed.
- Add the caramel mixture along with the boiling water and beat at medium speed for 2 minutes.
- Divide mixture between the three cake pans.
- Bake for 25 to 30 minutes, or until a toothpick comes out clean.
- Cool in pans for 10 minutes and turn out to cool completely on racks.
- (End of step 1 - stop here if you are making it in stages over a period of time)
Sugar Syrup
- Bring the water to a boil in a large pot.
- Reduce to medium heat and add the sugar, stirring until it completely dissolves.
- Reduce the heat to low and simmer for 10 minutes or until the mixture reduces and has the consistency of syrup.
- Add the vodka, mix well, and allow to cool.
- Store leftover in the fridge in a glass jar.
- (End of Step 2 - May be done ahead. Just warm the syrup before using)
Peanut Butter Mousse
- Whip the cream with ¼ cup of the confectioners sugar until it holds peaks - don't overbeat.
- Set whipped cream in the refrigerator.
- Beat the cream cheese, remaining confectioners sugar and peanut butter until well combined and smooth.
- Add 1 -2 tablespoons of heavy cream to the peanut butter mixture to loosen the it.
- Whip.
- Add one-fourth of the whipped cream and fold it gently into the peanut butter mixture.
- Add the remaining whipped cream and fold in gently until well combined.
- Refrigerate in an airtight container until needed.
- (end of step 3 - May be done up to 2 days ahead)
Assemble the Cake
- You will need to make a wide collar for the top of the springform to keep all of the cake and mousse in place. Do this by folding heavy duty aluminum foil in half and taping it around the outside of the springform to make the pan higher. Easy to do, hard to explain.
- Place the first layer in a 8 inch springform pan.
- Brush with sugar syrup.
- Add ⅓ of the peanut butter mousse.
- Place the next layer over the mousse gently.
- Brush with the sugar syrup.
- Add ⅓ of the peanut butter mousse.
- Place the last layer over the mousse.
- Brush with the sugar syrup.
- Add the remaining mousse and freeze overnight.
- (end of step 4 - Must be done 1 day ahead but can be done up to one week ahead of time)
Make the Ganache
- Heat the cream to simmering and add the chocolate chips, butter, and corn syrup.
- Remove from heat.
- Stir until well blended and smooth.
- Cool slightly.
Finish the Cake
- Remove collar and springform from cake.
- Spoon ganache over cake spreading gently with a spoon to cover top.
- Add more ganache to the edges and let it drip down the side, spreading it to cover the sides as it does.
- It will look horrible at this point. Really messy.
- Chill a few minutes until the layer of ganache is set.
- Finish with the remaining ganache, keeping it as smooth as possible.
- Chill for 20 minutes before serving.
Notes
Storage:
Once it's assembled, burnt sugar cake with peanut butter mousse needs to stay chilled. Refrigerate the leftovers in a cake carrier, or portion slices into another airtight container. Leftovers will keep for up to four days.
Feel free to wrap slices tightly in plastic and store them in the freezer. They'll last for about a month, and don't take long to thaw in the fridge!
However, if you don't plan on assembling the cake all at once, the individual components can be stored differently. Here's a quick run-down:
Unfrosted Chocolate Cake Layers—Wrap the cake layers tightly in plastic wrap and store at room temperature for up to two days. You can also freeze the layers for up to one month.
Sugar Syrup—Burnt sugar syrup (AKA simple syrup) made with a 2:1 ratio like ours lasts for about a month in a tightly-sealed glass jar in the fridge.
Peanut Butter Mousse—Store mousse in the refrigerator until you're ready to use it. It'll keep for about two days.
Tips:
-
- Read through the recipe once fully before getting started. Burnt sugar cake is relatively simple, but does require a few rounds of chilling. Plus, you'll need to start at least one day in advance.
- Feel free to use cocoa powder to dust the cake pans if you have some extra. If not, regular flour works just fine, too.
- It's important to use boiling water as the recipe indicates. I like to keep a tea kettle simmering so the hot water is ready to go when I am!
- Heat sugar carefully and watch it closely! Make sure the stove doesn't get too hot. You're technically making caramel and, though it's called "burnt" sugar cake, you don't actually want it to burn.
- A silicone spatula is the best tool to use when making sugar syrup. A wooden spoon can hold moisture which may make the sugar crystallize.
- First time working with sugar syrup? Stand back a little when adding hot water—it'll bubble up like crazy before settling down again.
- Golden brown syrup might be okay for caramel. However, when making burnt sugar cake, don't be afraid to let it reach dark brown!
- I add the eggs to the milk in a small bowl and whisk it well. This ensures the egg whites and egg yolks are evenly mixed into the cake batter.
- Stir gently when adding the flour mixture to the other ingredients. Otherwise, your cake won't be as light or tender.
- This burnt sugar cake recipe is brushed with burnt sugar syrup for extra moisture. Some bakers swear by syrup on top of their cakes. If the cake is very moist and soft when it's time to stack, you can omit the syrup.
- Let the chocolate sit in the hot heavy cream for about a minute. Then, slowly stir, starting from the center until you see the chocolate blending in. This makes ganache extra smooth and prevents air bubbles!
- Instead of a foil collar to make your springform taller, you can buy rolls of food-safe acetate online.
- The cake layers are tender and the mousse is extra light—this is great for taste, but not so much for cutting. It helps to slice the cake while it's still semi-frozen. Place each slice onto a plate and let it continue thawing for a bit.
Nutrition
Calories: 745kcal | Carbohydrates: 84g | Protein: 9g | Fat: 43g | Saturated Fat: 23g | Cholesterol: 128mg | Sodium: 406mg | Potassium: 318mg | Fiber: 2g | Sugar: 67g | Vitamin A: 1235IU | Vitamin C: 0.4mg | Calcium: 122mg | Iron: 1.9mg